Friday, February 26, 2010

St. Patrick's Day Wood Blocks and Kiss Me Pot with Leprechaun

This was a great project, so fun and I got to visit with a friend while making it. The wood letters are from a 2x4 I painted them all green and then cut the letters out of white vinyl with George and Basic Shapes on the shadow feature at 3-1/4 then I tied some jute around twice and tied a knot.
For the Leprechaun I used my Gypsy and cut everything at 4 on Paperdoll DressUp (I love that thing by the way) then also using my Gypsy I welded "kiss me" together with the shadow feature and cut it at 2 inches. After that I just used the regular letter and cut the "kiss me" again from some green sparkly paper by DCWV at 2 so it would fit on the shadow nicely.This is just a regular 4 inch clay pot I painted black then wrapped the jute around the rim 3 times and tied. The green frilly thing in the center is a balloon weight I found at the Dollar Tree. I stuck that in and then pushed it down to anchor it, then I added the rocks that were spray painted with gold paint from Krylon.I made this one for my sister using the Stamped Cartridge and the shorty feature cut at 3 inches. These probably could have been a it bigger but I didn't want to waste the vinyl. I also tied some jute (or you could use twine) around the blocks. Thanks for stopping by! :)

Thursday, February 25, 2010

cards from scraps

Here are some cards I made with the leftover scraps I just couldn't throw away from making the "family" letters for my friends birthday, you can see them HERE. I just love these papers from Crate Papers Cowgirl Collection, all I did on this 1st one was add a sticker from my stash and I sewed around the edge of the big brown square. This first one I am entering in a challenge called "Stuck on You" over at the Caardvarks blog, check it out HERE! This next one was all the odd pieces, I just lined them up and sewed down each one with a zig-zag stitch. Then I added a vellum phrase and some copper brads to finish it off.
And here is my final card, I punched as many circles as I need and then left one blank for the sentiment I stamped with a StudioG clear stamp, the ink is CTMH Autumn Terracotta it matched perfectly.

Wednesday, February 24, 2010

Friend card with Clear Dollar Stamps

Hi Everyone, thought I would post this cute card today. I used my Gypsy and the Storybook cartridge to create the marquee the ladybugs are stamped on so the size is specific to that image (I think it's 2-1/4x2-3/4) the stamp is from Clear Dollar Stamps called Loving Ladybugs and the sentiment is also from that set. I used my water brush and my ink pads to color the image in and added some ribbon around the bottom, the green is Papertrey Ink and the red dot is Offray. I also used my border punch across the very bottom. Thanks for stopping by!

Monday, February 22, 2010

Thinking of you with Forever Young Cartridge

I think this is a really fun cartridge. I was looking through my Joy of Card Making book the other day and came across this card recipe so I thought I would give it a try. I used some old Close to My Heart paper, then I made my sentiment on the computer and topped it off with the shoe cut from Forever Young. I cut these at 1 inch and since they cut in pairs I only needed to cut 6 times. Thanks for stopping by!

Saturday, February 20, 2010

Another Wedding card using Stretch Your Imagination

I just switched out the red for blue on this one, I really liked the blue and how it made the pieces pop more. Dress and Tux are the layers on Stretch, I had cut the people out but didn't like how it looked so I just used the clothing. I added some jewels to her dress and 1 on the tag. See the other card HERE for more details.

Friday, February 19, 2010

Clearly i Stamp Bling it Challenge

I saw this challenge at Clearly i Stamp and knew I wanted to play along, this uses Charlie Daisy from Clear Dollar Stamps, I just love him he is so cute. I also used some ribbon (the stripped piece in the background) and some Chocolate cardstock from CTMH to back the white cardstock. I stamped with versafine black and then used my watercolor pencils to color him in, then I used versamark over the entire piece and heat embossed with clear to make the colors pop. Then I added some stickles to each of the flower centers and the butterfly. I also used my cuttlebug on the turquoise paper and embossed it with the swirls folder, then I took my 2-way glue pen and added glitter to the raised areas. I also cut a tag from TBBM cartridge at 1 inch and stamped "Hi" with a CTMH set and added a jewel to that. This is also for the Peachy Keen Challenge.

Thursday, February 18, 2010

A bit different then before "thinking of you"

I added some flourishes to this card and some bling on the ribbon, but I'm almost convinced it might be too much, (see the old one HERE) what do you think? I also just learned how to make a watermark, see my name in the upper right hand corner, how awesome is that, I'm getting technical... hee hee :)

Wednesday, February 17, 2010

Wall Card/Picture Holder Board

This idea was found HERE, I saw it and knew I wanted to make one with my friend Savannah. This is the last thing we made together and I hoped it would be fun so that we could hang up all the cards we send to each other! If you go watch the video from the link above you will notice she used a cork board, I on the other hand was trying to keep the cost down and a cork board is like 6 bucks so I just used some thin wood I had in the garage and cut it to size for ours. I had to buy some batting (baby quilt size) and the fabric and ribbon. Plus you will need a heavy duty stapler and LOTS of staples! Start by stapling on the batting, then the fabric, make sure to stretch it tight but not too tight. Then start with the ribbon, I was glad she came over to help because the ribbon part is WAY easier with 2 more hands, she held it and flipped it and I stapled, it went a lot faster. Here is Savannah's, she loves purple so I knew she would love this color combo.
And a close up, we used kind of a sheer ribbon for the purple because they didn't have a solid in that color.
Here is mine, I already have some other things hanging in my craft room with the stripped ribbon and wanted to use if for my board. Wal-Mart actually had a solid turquoise color that matched and although its a bit skinnier it still worked great. Here's mine hanging with a card from my friend! :)

Monday, February 15, 2010

Wedding card challenge

I made this card for a challenge over at the Caardvarks blog, it had to be a wedding theme and this is what I came up with. I cut the dress and tux from Stretch your Imagination cartridge at 4-1/4, the scalloped oval is from Alphalicious cut at 1-1/4 then I stamped the "I Do" on it with versafine black, then added some stickles to the edge. Both the ring and the sentiment are from Studio G. I stamped the ring then colored it in with silver then stamped again to get the outline of the ring back, then I hand cut around the image and added a big jewel brad for the "rock" I adhered all the pieces with pop dots and added some black ribbon at the top and also some pearls from Kaiser. Red and black cardstock are from Provocraft, pattern paper is from Pebbles in my Pocket and white embossed is from DCWV, thanks for stopping by.Here's an up close of the detail

Sunday, February 14, 2010

Treat Box from Tags, Bags, Boxes and More

This was a fun box to make, my friend Savannah and I made these for our kids teachers. We used CTMH Carnation Pink cardstock that has been retired. We cut the box at fit to page on a 12x12 mat but I cant remember what the size ended up being, I want to say it was 8-1/2 for some reason but that's just a guess. Then we cut some white hearts from George and Basic Shapes at 1-1/2 and I stamped and inked the edges of mine with a CTMH stamp set. She did hers a bit differently and I didn't get pictures of them. I also cut 2 strips of cardstock and wrapped them around the outside. I used my EK Success border punch (scallops and dots) on the white and we also stamped along the bottom with a set from Clear Dollar Stamps.
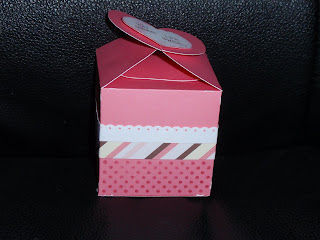
Here are some of the candies I put inside, the "candy heart" set is an old one from Stampin Up! The chocolate cardstock is CTMH and the stripped paper is Making Memories.This is a really cute card Savannah gave me, this turned out super cute, THANKS!

Saturday, February 13, 2010

Quick cards using leftover scraps

You gotta love being able to use all of the paper you get out, so what better way to do that than making some more cards with a different layout? See this post HERE... This one was super easy, just cut the pattern paper (Rob and Bob) to size, round corners and adhere. My sentiments are both from rub-ons I have had forever, I just spelled out what I wanted. Then I added some flowers and beads to the centers. I know you cant see it well but I also used my EK Success border punch on the green strip in the middle. Thanks for stopping by :)

Friday, February 12, 2010

Origami Butterfly's for Papertrey

This is for a challenge over on Capture the Moment blog to celebrate Papertrey Ink's 3rd Anniversary. It was to make some type of Origami so this is what I came up with, hope you enjoy looking! You can find the directions for the butterfly HERE, and lots of other fun creatures or flowers or whatever you want HERE.

Sentiment and flower border are from Clear Dollar Stamps Charlie Daisy set.

Wanna Be Mine?

I love this new Forever Young cartridge and I love these undies. I cut them out at 1-1/2 on some core-dinations cardstock then ran just the red parts through the cuttlebug with the swiss dots folder, then attached them with some pop dots. For the "wanna be mine?" part I designed that on my Gypsy with the gypsy font and welded it together. The marquee is from Storybook cartridge cut at 2-1/4 wide by 2-1/2 tall. I added some stickles to the white flower for some sparkle!This is what the inside looks like, the lips are from the new seasonal "Love Struck" cartridge. I cut them at 1-1/4 and then added some crystal effects from Stampin' Up! and some glitter. Cut a piece of white cardstock and inked the edges with Holiday Red ink from Close To My Heart.Here is a close up, sorry it's blurry but you can see the glitter better.

Thursday, February 11, 2010

Close To My Heart Seasonal, Sunshine and Outdoor Thoughts stamp sets

Savannah and I got together a few weeks ago and made some cards with just these stamps sets mentioned in the title above. We had a pretty good time even though we knew it would be one of the last times we would be able to get together and make cards. All the tags were cut with the Cricut and varied sizes using Tags Bags Boxes and More. I think the fish on the bottom card were cut from Animal Kingdom but I'm not positive.

The bunny, balloon and spider are all from Seasonal ThoughtsThis one is from Sunshine Thoughts and there are 2 more cards using the sun and the sand bucket but I guess I didn't get pictures of those...
This one is from Outdoor Thoughts

Wednesday, February 10, 2010

Look what I just won...


Thank you so much to Nikki over at Smells Like Homemade, she put up an awesome blog candy and guess who won... ME! I was so excited to check her blog this morning and see my name there and I can not wait to get this fun prize, I have never tried Whimsie Doodles Stamps or Mark's Finest Papers so I will let you know how I like them when I get it. If you have a minute you should go browse her blog, she has some great card ideas :)

Tuesday, February 9, 2010

quilt pattern everyday cards...

OK I'm not going to lie and sugar coat it but these were a real pain!!! I saw this idea in some mag and it looked super cute so I thought to myself "you can do that, how hard could it be?" so I get my paper out and start cutting little squares and then I go to read the directions and what do you think it says... "CUT THE PATTERN PAPER TO FIT YOU CARD AND ADHERE!" WHAT? Wait... its all one piece... what the heck? I was a little irritated to say the least but I already had all the paper cut (120 squares to be exact) so I figured I would just go ahead and continue on plus I knew I wanted to use the jelly frames and sayings that I have had FOREVER! This is how they turned out... I used rob and bob paper (again I have had it FOREVER) and then some of you might think I took the easy route and stamped my stitching... whoa ho my friends, nope... didn't have a stamp that would do that so they are all hand drawn!, enjoy! :)

Monday, February 8, 2010

random Forever Young cards

I saw an idea using this cartridge the other day and knew I had to try this girl out, I love that she is holding her hand up like she is pointing to whatever you want her to say. I was going to leave these blank but decided to go ahead and add a message to each one. She is cut at 5-1/2 and she fits perfectly on an A2 card, used a Martha Stewart boarder punch. My friend Savannah came over to make these with me, don't know what I will do without her, seems like we were always collaborating on what looked good with what... I already miss you friend!

Sunday, February 7, 2010

simple "hello" and "thinking of you" cards

These are fairly easy, I just picked 2 coordinating pattern papers and then a solid for the actual card. The pattern paper came from a Die Cuts with a View stack, then I cut a small scallop oval, 1-1/2 inches and inked the edge with black, the hello is rub-on letters from making memories. I added some ribbon and a jewel and called it good. The "thoughts of you" is a stamp on this card.

Thursday, February 4, 2010

more "FAMILY" wood letters

I made these for my friend a few weeks ago, it was her birthday and I thought she would really enjoy getting these and I really loved making them! I used crate paper the "cowgirl" line, yes I know it's old but I love it and I was saving it for something special and this was definitely the time to use it, she loved it!