Friday, April 29, 2011

Bunny on a cake pop!

This is what we decided to do for my kids classes before Easter, I think I made 110 of these yummy cake pops. This idea was found HERE. The bunny was supposed to be on the stick as well but we decided to just stick them in the bag at the top. This was a lot easier but when your making them be sure to have your cake pops sit in the fridge for about 15 minutes before you try to cover them in chocolate, it is a lot easier. The almond bark was a lot cheaper then candy melts and you can color it any color. Supplies used were 2 boxes of cake mix, 1 yellow and 1 chocolate, 9 boxes of bunny peeps. 1-1/2 tubes of frosting, 1 package of almond bark, 1 package of skewers cut in half, 1 package of sucker bags. I got mine at Micheal's and they came in a pack of 100.
 Chocolate cake pops with blue chocolate on top, we also made yellow cake with yellow chocolate on top.
 This is what we did for their teachers. I found these little containers at the dollar store then we put 1 cake pop bunny inside on some paper grass and then added some more chocolates.
Linking to


craft

Thursday, April 28, 2011

bunny and chick cookie pops!

My kids and I made some of these the week before Easter. I thought it was a really cute idea (found HERE) but when we started putting them together it proved to be pretty challenging. The bunnies are a definite NEVER AGAIN, and the chick's are a might. If you ever attempt these little guys be sure to use some chocolate between the cookies to "glue" the stick in, also if you use double stuff Oreo's it would probably be better with the sucker sticks. If you use regular Oreo's then use skewers in the middle otherwise you will break a bunch of cookies like we did! The kids loved them and I did get lots of compliments on them to the few people that got some, but it was definitely lots of work to stick each heart on the ears and all the jimmies for the whiskers :0)
 I sisnt make these, my hubby came home and helped the kids finish these, he even made me a special one that said "chick" on it :)
Thanks for stopping by today, sorry I've been MIA, I hope you will make sure to visit me next week as I have lots of projects lined up with a blog hop on Friday and a fun giveaway!

Thursday, April 21, 2011

Hop, Hop, HOP!

I thought I better hurry and get this up before Easter was over! I started this Saturday by cutting some leftover scraps of wood to size (5-1/2 x 5-1/2) then I got out my DCWV spring stacks and found some paper I liked (this is from the spring '07 stack) I cut the paper down to 5-1/4 x 5-1/4. I painted my blocks yellow first but it wasnt the yellow I wanted so I painted over that with this green color I had and added white to it to lighten it up. I like it a lot better, the yellow was super bright and not was I was going for, I did 2 coats. Then finally yesterday, when it was completely dry I had a chance to get my Gypsy out and size my letters. I used Don Juan for the font and sized them at 2.53, then cut them out on some black vinyl. I used some stickles to add some bling to my bunny tails'. Found this wide wired blue ribbon at the store and tied it around. Love how this turned out and thanks to Garden of Eden for the great idea.
I'm linking this up to Cooking With Cricut, FCCB, Sisters Stuff, 


The Girl Creative

Tuesday, April 19, 2011

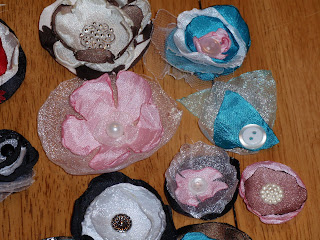
Lots of handmade flowers for your hair.

Back in February when I went to visit my sister we got this great idea to make some of those cute flowers that everyone is wearing these days. We started off with a trip to Joann's to get our fabric and some buttons then it was back home to start on our project. Let me tell you this, these things are addicting! We must have spent a good 4 hours making lots of different flowers with our girls :) and chatting. It was lots of fun and the girls came up with some really cute ones as well. in the mix is a square one I made and a triangle one my niece made, the sky is the limit with these things and no one said they had to be round!
 Some of my favorite ones!
 Here is the triangle, so cute and very creative, my niece gets that from me ;)

Monday, April 18, 2011

Lots of Cake Cards

 I loved this design so much I decided it was time to make some more, you can see the original card HERE. These were made with my Gypsy sized at 5.21, welding 2 of the base images together to create the card base. I used DCWV Latte cardstock. I also added some Twine and stickles. Do you like my card stand? I made it myself :)
Thanks for stopping by today!

Wednesday, April 13, 2011

Bunny Banner

I found this idea HERE last year but it was too late to make it so about a month ago I finally got started on it and got all my bunnies cut out and sewed together on this stripped purple ribbon that I thought looked pretty cute and went with it, after having it hung up for about 3 weeks I decided it just wasn't doing it for me and I knew something needed to change. My sister came over for a visit and told me it just didn't look right with that ribbon so I took it down and picked all the bunnies off (took about an hour) and then started sewing again...
this time it was on this green tulle :) I'm so happy with it now. I love the green! For the ends I just cut little strips of the tulle and tied them together to make a little ball. I am thinking about adding an egg garland just under the bunnies (like this one HERE) but I'm not sure I will, if I do I'll add pictures :) Thanks for making me realize the ribbon wasn't as awesome as I thought sis ;)
 Does my banner remind you of anything? :)
I'm linking this up at... Fantabulous Cricut, Patches Of PinkCraftomaniac, 
 Amandas Crafts and More

The Girl CreativePhotobucketcraft

Monday, April 11, 2011

DIY twine holder

Well after getting a super great deal on this twine from Olivia Place, I had to figure out somehow to store it. I bought 2 dowels and some hooks and used some blocks I had at home. I think this will work great and I do plan on painting it I just wanted to make sure it was going to work first. I love easy projects and I love looking at it when I walk in my craft room :) This project was also very inexpensive at under5 bucks, I cant complain.

Friday, April 8, 2011

Lots of cards- last ones.

Well here are the last cards I made for the big order. I have to think of something new because quite honestly I am sick of making these cards. I also made some for my stash that I will show you on Monday, I used all the leftover scraps and made about 20 more. That's the part I do love is making as many cards as I can with little going to the scrap drawer. Stamped again for the tags cut at 2 inches, CTMH stamps, adhesive jewels and square, flower and circle brads. lots of twine from The Twinery,  ribbon and jute. Have a great weekend :)

Thursday, April 7, 2011

lots of cards- up close

Here are some more designs for the gift card holder cards I made :) thanks for stopping by have a great day! I will post the last ones tomorrow. I used Stamped for the tags and CTMH stamps. I also added adhesive jewels, flower brads and snaps.

Wednesday, April 6, 2011

Lots of cards!

 A couple weeks ago, I got a call asking for 100 thank you cards, I was really excited as I haven't had a lot to do lately and this was just what I needed! I got busy asap, pulling out paper and cutting. I went with this design for all of the cards because the person asking for them puts gift cards in them so they had to have a "gift card" spot. I used lots of DCWV papers and matched up twine and ribbon. The tags are cut from Stamped at 2 inches and then I used various stamps from CTMH. I used adhesive jewels on the tags. The bottom right hand picture is all 100 of them with coordinating envelopes behind each section. I will show you more of the cards tomorrow so stay tuned :) Have a great day!

Tuesday, April 5, 2011

A Cherry Hello

These were super quick and easy to make. I cut the cherry's at 3 inches from Preserves, inked the edges of the green part with white ink then stitched with my white gel pen. Paper is Nikki Sivils, added some twine around the edge and used my Martha Stewart border punch. Stamps are from My Pink Stamper :)